Getting Started
This page is meant to be a guide on how to get up and running either of the Super Mario Galaxy games on your personal display at home, depending on the platform you decide to play on.
Setting up the game on a TV/monitor
For Wii players
Speedrunners who play on the Nintendo Wii will have no choice but to run on composite if they do not buy any additional third-party hardware.
Composite
Using default hardware that came with your Wii, it is possible to plug your console into a television that supports composite input.
It is strongly recommended that if you are to use composite video, that you play on a CRT television with the default RVL-009 A/V output cable that came included with your Nintendo Wii. The reason why it is so important that you play on a CRT television is that, similarly to other retro video game consoles, the Wii will have severe input delay if it is played with composite signal on a modern high-definition television or monitor.[1] For solutions on how to plug your Wii into a modern monitor, please refer to the HDMI section below.
There are several important settings to go over, therefore, once you have plugged your Wii into your display, go to your Screen settings from your Wii Menu. From there, select the TV Resolution option from the Screen settings and select the Standard TV (480i) option.
If you play on CRT, it is recommended that you turn on screen burn-in reduction. These televisions are severely prone to screen burn-in from static images, so your Wii accidentally staying on overnight could potentially leave permanent damage on your display.
If it makes your gameplay more comfortable, you may change your widescreen settings so the image corresponds to your display's aspect ratio, however, it should be noticed that the game is perfectly playable with both aspect ratio options on any display. Furthermore, 4:3 limits your FOV, which in turn makes the general surface you can point at smaller. This can be problematic for categories that require a notable amount of Starbits, or make certain skips more complex, such as Purple Idiot Skip at the end of Super Mario Galaxy 2 any%. For these reasons, it is generally recommended to play in 16:9 regardless of the display you play on.
HDMI
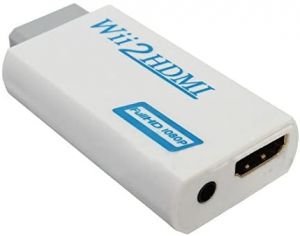
There is no HDMI output on a Wii. Therefore, if you wish to plug your Wii into a modern display that takes HDMI input, you will need to purchase third party hardware. The recommended hardware to purchase is a Wii2HDMI, which is a cheap converter that is widely popular in the competitive Wii scene, as it is extremely cheap, produces great video output and most importantly does not produce any noticeable input lag. Several companies manufacture these adapters, and they can easily be found on online stores such as Amazon or eBay. They are all essentially clones of one another and therefore it is unimportant which one a player might choose to purchase.
If you own a gaming-dedicated adapter such as a RetroTINK, you can use this as well without any issues. However, it is not recommended to buy cheap composite to HDMI adapters as most of them will cause input delay issues.
When playing on an HD display, it is highly recommended to run on a standard low-latency computer monitor. Standard HDTVs typically naturally produce an important amount of input delay regardless of the settings or type of input.
When playing on an HDTV, you will need to go the TV Resolution option in your screen settings (refer to the first animated GIF in this article) and select EDTV or HDTV (480p). The aspect ratio should be set to 16:9. The other options are up to personal preference.
For Wii U players
The Wii U supports the same connectivity options as the Wii, and also benefits from an HDMI port. The use of a Wii2HDMi is therefore not necessary for modern displays.
Composite
The same display and hardware requirements and recommendations as the Wii apply here. Please refer to section 1.1.1 for these recommendations.
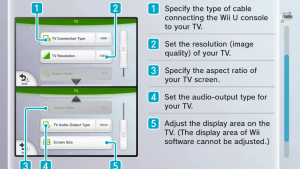
The display options that you will need to go to are located in the System Settings in the Wii U Menu. You will need to scroll right to the green section about displays. There, the console will give you instructions on what settings to select. A screenshot of these settings has been inserted next to this paragraph.
On the TV Connection Type section, you will need to select Non-HDMI in order to get the image to show on your CRT. The TV resolution has to be set to that of your television, typically 480p for CRT televisions. It is also possible to change the aspect ratio to 4:3 when having selected 480p video quality, but for the reasons mentioned above, it is not recommended to use 4:3 quality in any circumstance.
HDMI
Being an eighth generation console, the Wii U is an HD console and benefits from an HDMI port. There is no need to purchase adapters to run a Wii U on a modern display, as it is designed for such use.
The same display and hardware requirements and recommendations as the Wii apply here. Please refer to section 1.1.2 for these recommendations.
The display options that you will need to go to are located in the System Settings in the Wii U Menu. You will need to scroll right to the green section about displays. There, the console will give you instructions on what settings to select. A screenshot of these settings has been inserted next to this paragraph.
On the TV Connection Type section, you will need to select HDMI in order to get the image to show on your display. The TV resolution has to be set to that of your television, typically 720p or 1080p for computer monitors.
For Switch players
An official guide on how to connect your Nintendo Switch to a display can be found here.
For Dolphin Emulator players
As of Summer 2022, emulator runs have been permitted on the speedrun.com leaderboard for both games. In order to setup Dolphin, follow this guide. For any help with setting up SMG1/SMG2 on Dolphin Emulator, it is recommended to ask questions in the Super Mario Galaxy TASing Discord, as many users there will be knowledgeable enough to provide support.
*Note: In order to run a game on dolphin, you must own a legally obtained ISO (Disc Image File) of the game.
Homebrewing your console
Installing homebrewing software is, while not necessary, an often integral part for speedrunning these games. Homebrewing allows you to load practice cheat codes, ROM hacks and foreign region discs onto your console. The process of installing homebrew is a very simple softmod that requires nothing but a regular SD card.
Homebrewing a Wii
To learn how to install the Homebrew Channel on your Wii, follow this guide.
Homebrewing a Wii U
To learn how to install the Homebrew Channel on the virtual Wii Menu of your Wii U, follow this guide.
In order to fix the aspect ratio of your Wii U in the homebrew channel, you will need the Aspect Fixer [direct download link] application. For information on how to install homebrew applications, look at the instructions below.
Loading foreign region discs
Loading foreign region discs is an integral part of speedrunning these games, as language differences are very notable.
When you purchase a disc from a region that is not native to your console, it is not necessary to purchase a console from that region as well, unless you have a Korean disc (refer to section 3.2).
The Gecko OS Method
Gecko OS is a homebrew application that lets you load cheat codes (or, Gecko codes) as well as region unlock your console. It is the main method for speedrunners to region unlock their console as it does not affect disc load times and is safe for the console, unlike other solutions.
Downloading Gecko OS
In order to load a foreign region disc, you will need to download and install Gecko OS on a Homebrewed Wii or virtual Wii environment (guides to homebrew your console are hyperlinked in section 2).
Installing Gecko OS
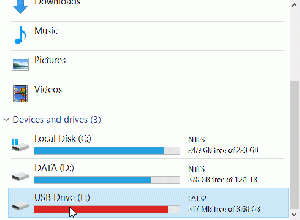
Once you have downloaded the Gecko OS zip file, open it and insert the SD card that you use in your console to homebrew, and drag the contents of the zip into the /apps folder of your SD card. A gif has been attached to show this simple procedure on the right. The SD card in the gif is called "USB Drive" as a USB adapter has been used to load the SD card. From there, safely remove the SD card from your computer and put it in your Wii.
Loading Gecko OS
After having installed Gecko OS in your SD card, open the Homebrew channel from your Wii menu. From there, you should see it appear, and can easily load it by clicking on it and pressing Load. Whatever you do, it is important to mention that you should not load Gecko OS with a Wii Remote that has a Motionplus adapter, or Motionplus inside (those that came out with the Wii U after 2014). Just like many other ancient homebrew applications, they are not supported by the application and the controller will refuse to connect, forcing you to unplug the console and replug it.
Settings
In order to load a foreign region disc, you will simply need to choose the language of the region you want to play as. For Chinese discs, pick Japanese. A list of these settings is inserted as an image on the right.
The exception of Korean region discs
If you stumble across a disc of Korean region, please know that you will need to purchase a Korean Wii in order to speedrun on it. Gecko OS does not support loading Korean discs, and therefore, the only way to load them on an occidental or Japanese console is through the use of an application called Nintendont, which is not allowed for RTA speedruns as it affects loading times. You may only use Nintendont to load your disc if you wish to do IL speedruns in Super Mario Galaxy 2, as these are timed with an in-game timer.
Loading Gecko practice codes
Gecko codes are incredibly useful tools that let you modify memory addresses in the game. They are essentially cheat codes. Speedrunners use Gecko codes, at least in the first game for now, to make practice easier. Please also do note that Gecko codes do not work with eShop versions of the game, only discs.
Creating Gecko code files
To play with Gecko codes, you need to create files that you will insert in the The recommended tool to create Gecko code files is the Online GCT Maker.
Game ID
In this page, you will need to enter the game ID. This ID consists of three characters followed by the region (U, P, J or W) and the numbers 01. The following table shows the different game IDs depending on the copy you own. There are no known Gecko codes for the Korean versions of the game, because as mentioned earlier, Gecko does not load Korean discs.
| Super Mario Galaxy | Super Mario Galaxy 2 | |
| North America (NTSC) | RMGE01
|
SB4E01
|
| Europe (PAL) | RMGP01
|
SB4P01
|
| Japan (NTSC) | RMGJ01
|
SB4J01
|
| Honk Kong/Taiwan (NTSC) | RMGW01
|
SB4W01
|
Adding codes
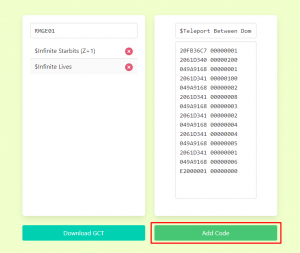
All Gecko codes you will come across will have the format of a title followed by lines of memory code. The title does not matter and can be changed to whatever you wish, however, it is recommended that you keep comprehensive titles for the codes you add to make navigation of the codes you have loaded easier. The memory addresses need to stay completely unchanged, as otherwise, the Gecko code will not function. See the attached image to know what you should insert. Once you have all the codes you want, download the GCT file.
Avoid mixing too many Gecko codes at once, as it may make the game crash. You may need a lot of trial and error to make work several Gecko codes together and work out incompatibilities.
Loading codes
Once you have downloaded the GCT file, make sure its name is the game's ID followed by a .gct extension (e.g.: RMGE01.gct). Create a folder called codes in the root of your SD card and place the GCT file there. Then, safely extract the SD card from your computer and put it in your console.
Load Gecko OS (instructions on the installation of Gecko OS can be found in the foreign discs section) and in the settings, enable SD Cheats. Then, load the game via Gecko OS and the codes should be activated.
List of Gecko codes
For a list of all known Super Mario Galaxy and Super Mario Galaxy 2 Gecko Codes, visit the Gecko Codes page.
Capturing Gameplay
Hardware Requirements
Capturing gameplay will inherently require that you purchase a capture card and some other hardware.
Composite
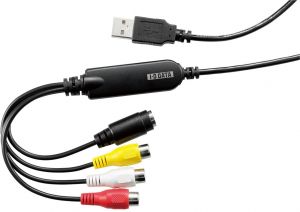
To capture composite video and audio, you will first need a capture card. The best composite capture card on the market is widely accepted to be the I-o DATA GV-USB2 (pictured on the right) both in price and quality[2]. A full guide on how to set-up the GV-USB2's drivers can be found here.
The second thing you will need to purchase is a piece of hardware that lets you split the signal, in order to send video signal to both your capture card and your display. Some CRT televisions have "line out" ports, and if that is the care for your television, you can easily just plug composite cables in these ports and into the capture card, without purchasing any extra equipment. However, if your television does not benefit from such ports, you will need splitters. A great explanation of different splitters you can use can be found on the 5th page of toastrider91's SM64 console setup guide. Ignore everything that has to do with S-video, and the process should be more or less the same for purchasing splitters.
HDMI
To capture HDMI video, you will likely need to allocate a greater budget, as HD capture cards are much more expensive than composite capture cards.
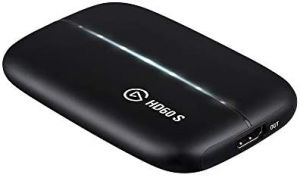
Currently, one of the most popular capture cards among speedrunners is the Elgato HD60S, pictured on the right. It offers Elgato's great ecosystem integration and it is very user-friendly for streaming your gameplay online. There are some other options that can be cheaper, and most of them will be perfectly fine for recording or streaming these specific games. However, avoid buying very cheap (15-30$) capture cards, as most of them will not actually capture in Full or even partial HD.
Two-Player Mode
Although most people only run with one controller, there are some strategies which involve using co-star mode. This requires finding a comfortable setup for holding and using an extra controller.
Wii and Wii U
If playing on Wii or Wii U, you will need to use a second wiimote in addition to the standard wiimote and nunchuk. Typically, 2P runners hold this in the same hand as the 1P wiimote, with the wiimotes back-to-back. You can then use your middle finger to press A on the 2P wiimote. Although not strictly necessary, using velcro strips, tape, or something similar to hold the wiimotes together can help prevent slipping. Velcro is often favored as it allows detaching the wiimotes for stars where 2P is not useful.
Other, less common, options involve holding the wiimotes side-to-side or placing the 1P wiimote on the floor (for some stars) and using your feet to press A. These are typically seen as less convenient, but may be worth investigating if they seem like they will work well for you.
Switch
There are few good options for doing 2P on 3D All-Stars. One effective setup is to use joycons for 1P and a second set of joycons for 2P, and rebind A on the 2P joycon to ZR. You can then set the left 2P joycon down on a table, as it is unnecessary, and hold the right joycons on top of each other. This works fairly well, as the joystick on the 2P joycon is similarly sized to the ZR button on the back of the 1P joycon, allowing them to line up fairly well despite the joycon being shaped less regularly than a wiimote. The obvious disadvantage of this setup is that it requires having two sets of joycons, which is something most people may not have access to.
If you play 1P with a pro controller, it is possible to hold a joycon against one of the handles and use that for the second controller. Although the joycon will point at a weird angle, being able to re-center it makes this fairly usable. However, using a pro controller for 1P means that you cannot do a nunchuk / left joycon spin, which will lead to disadvantages in a few levels (although some of them, when they are used to gain extra height as Luigi, can be compensated for with 2P jumps to some extent.) 2P saves more time than nunchuk spins, however, so this may be the best setup if you are unwilling to buy a second set of joycons. In theory, it would be preferable to use joycons for 1P and the pro controller for 2P, but there is no clear way to go about doing so currently – especially since it would necessarily involve pointing a pro controller, which is very cumbersome to do without using two hands.
- ↑ toastrider91: N64 Setup Guide for SM64, p. 3
- ↑ idem. p. 5

